I've been very negligent in my posting lately, apparently being unemployed or underemployed is more conducive to blogging than having an intensive internship. Luckily (or not so luckily) you haven't missed out on much because I've been too busy to do much crafting and the weather is so bad here that not much is going on in the garden either.
There are a few interesting things though. I believe I mentioned earlier that I had bought all kinds of crazy things to start from seed this year and now some of them are actually producing!
Here is a ground cherry in action:
And here is a tomatillo:
Although I knew the ground cherry and tomatillo were fairly closely related (both being husk nightshades) I didn't realize how similar they were. Before they fruited the only really distinguishing characteristic between the two plants was the purple vein running along the stems of the ground cherries.
I'm actually really excited about both of them too. Not only are they are producing heavily (provided nothing happens before they ripen) but they are also really attractive plants (not nearly as random and awkward as a tomato) with pretty little flowers.
I also have jalapenos!
The one thing that concerns me is that after it produced these three it stopped flowering and shows no sign of starting again, possibly due to the bizarre weather we had. If it indeed is done producing those will be expensive peppers ($1 a piece!).
Finally we actually have...tomatoes!
For those of you who are already effected by the nasty late blight that is devastating tomato crops all over the northeast...don't worry these sucked anyway. I mean they were really bad, mealy and flavorless. Again the crappy conditions (cold and wet through all of June and July pretty much) are probably to blame.
I'd rather not end a post on such a sad note as the generally badness of New England tomatoes this year so here is some absolutely professional looking bread that mom made.
Although the word rustic seems to fit I also can't help shaking feeling that the one on the right kind of looks like a toe. Sorry if that puts you off bread for awhile.
Sunday, August 2, 2009
Monday, June 29, 2009
Escarole
I thought I was already a vegetable nerd but since I've started working on a farm I've been exposed to some new veggies I hadn't really used before. I'm sad to say one of these was escarole:
I've been missing out. Although it's in the endive family escarole looks more like a head of lettuce although I wouldn't really eat it like lettuce. It's a little tougher and has a mild bitterness (but definitely not too much) so it's delicious cooked.
Since it's featured heavily in Italian cuisine that's what we stuck with: first we made the classic escarole and beans (or more accurately: "scrole and beans"). This dish is basically cannellini beans, escarole and lots of garlic with some Parmesan for serving. We also put some sausage in ours although it certainly can be a main dish even without meat. Also: it really should be served on or near some good toast.
Next we used some escarole in Italian wedding soup. Our version had spicy meatballs, escarole, potatoes and onions in broth although there are lots of other variations of this soup. Again the escarole was fabulous.
If you can find some at your local farmer's market I highly recommend trying some. Cook it the way you would any other cooking green or throw it in a soup.
Anybody have any other favorite ways to use escarole?
Tuesday, June 23, 2009
Bag Balm and 100th Post!
This is my 100th post on this blog. Woo hoo! In celebration I may eat some cake. You should too.
In other news: after my recent post on hand balm a wise person sent this along in the mail to me:
Bag balm! Originally for udders but now loved by humans and cows alike, including Shania Twain! (Don't worry I didn't just call her a cow.)
Besides being awesome for my gnarly farmer hands it comes in the most adorable tin:
The best part though is probably the picture of udders on one side:
From what I've read this stuff has a multitude of uses, from soothing a fresh tattoo to diaper rash. I bet it's also amazing for dry feet. You could slather a bunch on before bed and then put socks on and wake up with feet as soft as udders! I may have to do that to someone I know (who has particularly dry feet) while they are sleeping. I'll let you know how that goes.
Sunday, June 21, 2009
Garlic Scapes
It's garlic scape time of year again. For those of you who haven't had the privilege of growing your own garlic (I highly recommend it), scapes are the flower stalks that you pull off around this time of year.
They are actually quite yummy, with a fresh slightly mild garlicky flavor. Although you can use them any way you would normally use garlic they are also good chopped up in salads or grilled whole. I put them on a grilling rack so they wouldn't slip through the cracks but if you're brave you could throw them right on there, just watch them carefully so they don't burn.
These are some of what we picked at home, I think we should have about 40 clubs of garlic if all goes well and they don't rot right in the ground from all this rain.
Interesting fact I recently discovered at work: if you pick about 2000 of these you'll end up with white crystals all over your hands from the sap that comes out of the scapes. I have no idea what it is besides garlic juice but I smelled like it for the next couple days. At least I didn't have to worry about vampires.
Monday, June 15, 2009
Totally Shameless Product Promotion
I'll tell you upfront that I have no other motive for telling you about this product besides the fact that I really like it.
Back to the beginning: when I first started my current job (organic farm intern) I discovered that the combination of lots of dirt and wind can make your hands really freaking dry. I'm not really sure why mud is considered a spa treatment because in my experience it doesn't really do much for your skin besides dry it out. But clearly I've never had a spa treatment so what do I know.
Although I have my day to day moisturizer that I really like (Nature's Gate Tea Tree Lotion since I'm name dropping anyway) it wasn't cutting it for my terrifyingly dry rough hands. I knew I needed something more in the "balm" category, ie: more oily and thick.
I went to my local food coop prepared to pay out the nose but I was amazed when I looked at the selection. Burt's Bee's was $10 for a tin and a smaller brand was $20! But this was only about $6:
Not only does it work fabulously but could you resist that badger? Now what I can't figure out is how they extract the balm from the badger. Do they have to kill it and render it or do they just provoke it into excreting it from a gland?
Monday, June 8, 2009
Recipe Organization for the Obsessive Collector
I'm sure you've figured out, based on the fact that every time I go somewhere I buy I cookbook, that I'm a rather obsessive collector of recipes. Besides buying cookbooks I also subscribe to cooking magazines, look for recipes online and take cookbooks out of the library. What this means is that I end up with stacks of recipes that I've printed from the internet, torn out of magazines or even photocopied from books.
My only salvation from being killed by a toppling stack of cookbooks is that I get many of them from the library first and if I see only a few recipes I like I just photocopy them using our handy scanner/copier/printer. The downside is that if there are too many recipes to copy I end up buying the book.
I guess there is technically another downside which is that I end up with stacks of loose recipes. They accumulate on all surfaces, even the cats, until eventually you get an avalanche of paper or someone spills something on the entire pile. Either way it's a mess.
My solution: three ring binders! Although I always pinch my fingers in the rings I still think that three ring binders are one of the marvels of modern technology. Here are two other marvels which help me get organized:
Without my paper cutter and fancy ass hole punch it would take me a lot longer to get all my recipes stored away. It also helps to have pretty binders:
My recipes are divided into several categories: cocktail recipes, canning/preserving recipes, desserts, and those I've cut out of Cooking Light (which I have a subscription to). I really enjoy the magazine and there are actually quite a few recipes per issue that I want to try so to make them easier to find I just cut them out and tape them onto paper so I can recycle the rest of the magazine. It saves space and time when I go looking for the recipe because let's face it, no matter how much we think we're going to go sift through old magazines for those recipes we liked, we never do.
I suppose I could save space by getting rid of the photographs but some of them are so pretty, it's half the reason I want to try the recipe!
Finally there is my binder of everything I've photocopied or printed from the computer. It's at least and inch and half thick.
I made dividers for the different categories to make finding things easier. I used old folders (I had a stack of legal sized ones for no apparent reason) and cut them to size so I'd have the tabs for easy flipping.
I got a little crazy with my categories: appetizers, breakfast, breads, tapas, soups, vegetable sides, starch sides, main dish: Mexican/Cuban, main dish: Asian, pasta, pizza/sandwich, main dish: seafood, main dish: veggy, main dish: meat, main dish: meat light. These are of course customizable so if you aren't as nutty as me you could simplify.
Once it's all established it's easy to keep organized. I just hole punch the new recipe and slip it in.
A final upside to cooking from photocopies is you feel very little guilt about scribbling notes all over the recipe once you've tried it, or spilling food on it for that matter, which I inevitably do.
My only salvation from being killed by a toppling stack of cookbooks is that I get many of them from the library first and if I see only a few recipes I like I just photocopy them using our handy scanner/copier/printer. The downside is that if there are too many recipes to copy I end up buying the book.
I guess there is technically another downside which is that I end up with stacks of loose recipes. They accumulate on all surfaces, even the cats, until eventually you get an avalanche of paper or someone spills something on the entire pile. Either way it's a mess.
My solution: three ring binders! Although I always pinch my fingers in the rings I still think that three ring binders are one of the marvels of modern technology. Here are two other marvels which help me get organized:
Without my paper cutter and fancy ass hole punch it would take me a lot longer to get all my recipes stored away. It also helps to have pretty binders:
My recipes are divided into several categories: cocktail recipes, canning/preserving recipes, desserts, and those I've cut out of Cooking Light (which I have a subscription to). I really enjoy the magazine and there are actually quite a few recipes per issue that I want to try so to make them easier to find I just cut them out and tape them onto paper so I can recycle the rest of the magazine. It saves space and time when I go looking for the recipe because let's face it, no matter how much we think we're going to go sift through old magazines for those recipes we liked, we never do.
I suppose I could save space by getting rid of the photographs but some of them are so pretty, it's half the reason I want to try the recipe!
Finally there is my binder of everything I've photocopied or printed from the computer. It's at least and inch and half thick.
I made dividers for the different categories to make finding things easier. I used old folders (I had a stack of legal sized ones for no apparent reason) and cut them to size so I'd have the tabs for easy flipping.
I got a little crazy with my categories: appetizers, breakfast, breads, tapas, soups, vegetable sides, starch sides, main dish: Mexican/Cuban, main dish: Asian, pasta, pizza/sandwich, main dish: seafood, main dish: veggy, main dish: meat, main dish: meat light. These are of course customizable so if you aren't as nutty as me you could simplify.
Once it's all established it's easy to keep organized. I just hole punch the new recipe and slip it in.
A final upside to cooking from photocopies is you feel very little guilt about scribbling notes all over the recipe once you've tried it, or spilling food on it for that matter, which I inevitably do.
Friday, May 29, 2009
Broken Key Fix
(I hope you're prepared for the most exciting and revolutionary craft project of this decade.)
I always though my purse was a tough place. With all those things jostling for space (keys, wallet, nail file, pocket knife, ping pong balls, chapstick, and moisturizer to name just a few) it is no surprise when the occasional pen gets broken. But when my boyfriend presented me with a broken key I realized that men's pockets may be even worse than my purse.
To be fair this key was crappy to begin with, instead of a metal top it was all plastic and I think it might have actually been partially broken when he acquired it anyway.
Whose brilliant idea was it to make the top out of plastic anyway? Seriously, I want to meet that person and have a word with them.
When it finally broke completely I realized it was a rather dire situation. With no way to attach it to a key ring it was just asking to get lost. (And trust me, he'd lose it.)
So I sewed a solution which I think was rather clever if I may say so.
It was basically a rectangle of fabric I folded in half and then sewed up along both sides. I then flipped it inside out and cut a little slit in the folded end. I reinforced the slit like a button hole so I had a tube with the key sticking out one end and the other end was open. I folded the open end over a key ring and sewed it down. Here you can see the side that was folded down:
And here you can see my reinforcing:
I also made a point of choosing nice manly fabric. Had it been for myself it probably would have been purple and floral. The best part was that it took all of about five minutes. I know I could have just gone and gotten a new key made but in my experience when you copy a key the copies tend not to work as well as the original.
I'll even admit I was tempted to make decorative floral covers for all my keys...but that would have been a little too Martha for me.
Sunday, May 24, 2009
First Salad of Spring
Thanks to a concerted effort and some row covers we've already had our first salad from the garden! (Well actually it was at least a week ago but I've been neglectful about my posting so here it is finally:)
The main component was mesclun mix and baby salad greens that we grew by direct seeding them. The problem with that method, especially with a new mesclun mix, is that you're never quite sure what is something you actually planted or just something that volunteered. Once we managed to discern which plants were edible and picked the leaves that were big enough I also threw in some violets and redbud blossoms. I was very lucky that they were both blooming at the same time because they are both edible and look amazing together.
This was a fancy shmancy dinner since we had a guest so the salad was served alongside homemade bread and a vegetarian curried mushroom parsnip pie I made. The pie was delicious but it wasn't actually vegetarian since I used chicken broth. I'll also confess that I used storebought crust since it was already in the fridge.
Here's a bonus recipe that isn't nearly as seasonally sensitive:
Can you tell I only thought to take the picture after I'd started eating it? This one may not look nearly as flashy but what it lacks in appearance it more than makes up for in flavor. Plus I think it's super easy (once you find the ingredients) considering how fancy it seems.
The first major ingredient is Israeli couscous (which is different and larger than the North African couscous most people are used to seeing). It basically tastes like a little pasta so if you really can't find it you could definately substitute orzo (although you miss some of the nice toasty flavor of the couscous).
Next we have French lentils (or Lentils du Puy, or green lentils). These lentils stand above all other lentils in my opinion because of their texture and flavor. They stay firmer when cooked than other lentils so they work perfectly for a salad (instead of turning into mush). The flavor is also amazing, when I cooked them for the first time I swore someone had thrown a bunch of black pepper in there with them but that is actually just how they are by themselves. Their color is also really cool: when raw they are a mottled bluish greenish color. I hope you can find them reasonably priced, I get them at a local natural food co-op in bulk so they aren't terribly expensive.
Next you'll need feta. I used Narragansett Creamery's Sea Salt Feta which is local! I'm excited about local cheese because until recently (as far as I'm aware) there wasn't any large scale cheese production in Rhode Island (at least not for a couple of hundred years). If you happen to be in RI and get to try some the Atwell's Gold is especially delicious.
Back to the salad: once you've located your ingredients you just boil and drain the couscous and lentils (separately). I don't really have a definite timing for either, I just keep checking them until they're just tender enough.
Once drained I dress them with olive oil (I won't tell you it has to be this or that fancy kind, let's just say the best you're willing to pay for) and balsamic vinegar. I also throw in some herbs (maybe oregano or thyme and either fresh or dry, depending on if I feel like going outside to pick it). I also (gasp!) use garlic powder.
When the salad is ready to serve toss in some feta and if it's a Friday night and you're feeling really crazy you can serve it on a bed of arugula. I just happened to have some on hand so I ate mine with it and it's perfect because the peppery flavor in it really compliments the pepperiness of the lentils.
Now if I were to suggest that this is a meal in and of itself I'm sure the meat lovers out there would scoff but I'm serious, I can sit down and eat a huge bowl of this for lunch. It would also be great to bring to a party if you want to seem like a real fancy pants. Once you start rattling off the international list of ingredients (preferably with an English accent) people will surely be impressed.
Labels:
French lentil,
Israeli couscous,
redbud blossoms,
salad,
violets
Saturday, May 16, 2009
Peas
Although we have lots of plants started this year we don't have much out yet besides greens and snow peas. But oh do we ever have snow peas. First we soaked them overnight and planted them in a bed outside. After we'd finished that we realized we still had lots of extras that were already soaked so we either needed to use them or throw them out.
We used up some of them by planting them in toilet paper tubes and keeping them inside to germinate. The rest we put between two damp paper towels to sprout. Once those sprouted we picked one of our big barrels outside that needed to have a non-nightshade in it this year (for disease avoidance rotation reasons) and planted them in it.
So now, although we already had a bed and a container filled with peas waiting to sprout outside we also had these inside:
Since I have trouble throwing away any baby plants we found another container to plant these in. We used freshly cut branches to make a tipi for them once they start climbing:
Here's where we learned our first lesson: even though we planted the sticks upside down they still started to get buds on them and they're probably rooting. That may be a fun mistake to deal with later in the year. Next time we'll use dry bamboo.
We also learned that peas transplant fine. But here is the really interesting thing: the ones we started inside and put out last are the biggest. The ones we sprouted and then planted outside are considerably behind them and the ones we planted directly outside are the furthest behind. So the lesson is that if you can manage to keep seedlings inside as long as possible they'll get bigger faster than if you put them outside and it's still chilly. I'm sure this information was already in a book somewhere but it's much more convincing when you experience it first hand.
Finally, did you know if you have extra peas plants that need thinning you can toss the pea greens in salad as long as they're still fairly small? It's crazy to think that what some gardeners throw away other people pay big money for at restaurants. Speaking of salad...well you'll just have to keep checking back for that post.
Friday, May 15, 2009
Cookbooks Etc
Buying used or vintage stuff doesn't count as materialism or consumerism because it isn't contributing to the supply for new goods. At least that's what I tell myself. So without further apology here is the stuff I've found recently:
First the cookbooks, this one was too gorgeous and for a couple bucks way too good a deal to pass up:
I also love unusual cookbooks and this one seemed fairly unusual:
That is of course until I got home and my dad informed me he already owned a Burmese cookbook. My thunder was sufficiently stolen.
I also just found my own copy of this for only a couple bucks:
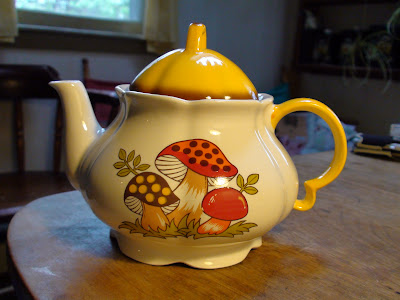
I think I'm the only one who likes it but I couldn't resist this teapot:
Here's the back:
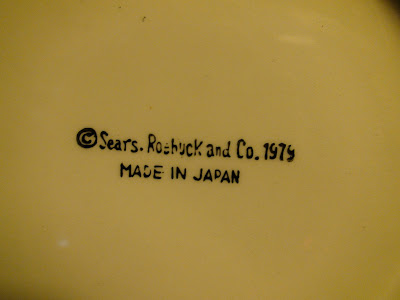
And here's the mark on the bottom:
And this mug, the owls!:
Finally I got this box:
I think it probably came with some wine in it or something so it might be silly that I paid for it but I like it and it seemed super useful...now I just have to think of something to put in it.
And now I present a photo essay that illustrates what it is like to try to photograph something with a cat around:
Fin.
Monday, May 4, 2009
Ginger
I've decided you can never really have enough ginger in your diet. Besides being yummy it is also really good for upset tummies and muscle aches (which I've had plenty of since starting to work again). Actually you probably could have too much ginger but I doubt I'm at any risk for that. The problem is that fresh ginger is kind of a pain in the ass, at least I think so. If a recipe calls for a couple teaspoons you have to fish it out, peel it and grate that little bit, only to have to repeat the process the next time you need a little and by my standards that is a pain.
We accidentally stumbled upon a way to avoid this hassle. Mom really likes ginger tea so we started using the food processor to grate whole pieces at a time and then we divide it into tablespoon sized piles which we freeze. This way when mom wants to make a couple cups of tea she can just take one cube of ginger out of the freezer. But it also works great for cooking. The other night I had a recipe that called for fresh grated ginger so I just threw in a couple pieces, still frozen.
It even kind of works for sun tea. Although our usual recipe calls for mint of some kind along with the black tea I wanted to try some with ginger. Using the frozen grated ginger you definitely get some ginger flavor but it's not super strong.
The scary looking stuff floating on top is actually the ginger. It also serves as a good theft deterrent, who would want to steal something that looks like that?
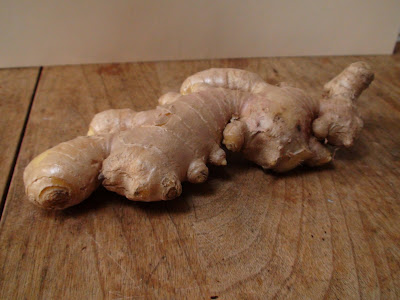
We also tried planting some. We started with a fresh piece (we tried to find one that wasn't too dessicated). This one already had little knobs like it wanted to sprout so we figured it was a good candidate. Here it is in all it's knobbiness:
Look at that knob close up; doesn't it look like a claw?
We cut off pieces and soaked them overnight.
Doesn't it look like a monster's toe floating in there?
The next day we planted them:
We planted three pots and put them in a sunny spot. I can report that a few days later there is some sort of leaf poking up so I think it worked!
I'll let you know if we actually ever get any ginger.
Subscribe to:
Posts (Atom)