Tuesday, February 24, 2009

Decoupage Insanity

It's funny how taking up a new kind of cooking, baking for instance, makes you realize how many more kitchen gadgets you need. I never thought I would be in desperate need of a candy thermometer, or an apple corer. Luckily I've been successful in finding most of the things I now desperately need, although a few of them have taken some extreme effort to find.

Although not a necessity, I've found that nice trays are important for cookie presentation. After I've spent hours slaving over cookies it seems like a crime to throw them into an old take out container. (Yes we save the nice plastic ones for leftovers. But don't worry we don't microwave in them.)


When I unearthed this one from my parents collection I was devastated by it's state of neglect. I love paisley! Turns out they used it as a tray to keep the cats' water and food dishes on for a long time. Stupid cats.


The only logical thing was to rehab it. I had read about using fabric to decoupage. Slapping a piece of fabric on it and calling it a day seemed like an easy solution. Somehow though my mom talked me out of the fabric idea and convinced me to use paper. (Not really sure, looking back, how that happened.)

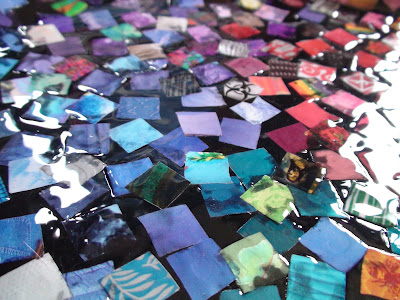
Unlike some crafters I don't have a collection of wonderful vintage images to use for decoupaging. (Where the heck do you get those anyway?) Even if I knew where to get them I'd probably be too cheap to buy them. My only choice therefore was the magazines we have lying around. For whatever reason I decided I needed to cut out tiny squares of solid colors to do a mosaic like thing.

I started by cutting a template out of orange juice carton plastic. I then laid this down on whatever part of a page I wanted and used an exacto knife to cut around it. I then repeated this like 8,000 times.

In the mean time I also spray painted the tray black. I sanded it a little to make sure the paint would stick but not enough that I actually got rid of the texture from the chipped paint. I was feeling too lazy.


Now came the worst part: deciding how to arrange the squares. I literally tried at least 10 different placements, putting all the squares down and then taking them off again. I think I may have gone a little mad in the process.


When I finally decided on the configuration that irritated me the least I put them all down with Elmer's glue and then gave it a coat of Mod Podge matte finish. I was using one of those spongy brushes and the pieces were wrinkling and the edges were curling so after that initial coat dried I switched to Royal Coat high gloss spray. I like the gloss and spray much better but it built up really slowly. I ended up using the entire can and it still could use more layers.


But it's nice and shiny!

So the downsides to this project: I have no idea what I'm doing decoupaging. There are too many products and I have no idea which to use. It was expensive because I needed so much spray to get it nice and thick. Finally, that spray stuff takes forever to cure, like two weeks at least!

So overall very frustrating. Fiddley crafts just aren't for me.

Monday, February 23, 2009

Candied Ginger and Lemon Peel

When I decided I wanted to candy some ginger I got to thinking about the ginger tea we always drink. It's Stash brand and it's actually ginger lemon. (I highly recommend it for when you are too lazy to make your own ginger tea. We keep a few boxes on hand at all times.) I like it a lot more than straight ginger tea because the lemon tempers some of the heat.

So I decided when I candied my ginger I'd do some lemon peel at the same time. I started researching on the internet for instructions and guess what I found? There are as many different instructions for candying ginger as there are people who've tried it. So I kind of averaged out the recipes and hoped for the best.

To start with I had to zest my lemons. Mom insisted on organic lemons (since you are using the peel which is where all the chemicals would be) so we had to shlep out to one of the local health food stores (actually we had to try two before we found them). Some instructions want you to cut the peel off and then cut off the white pith. I found that using a vegetable peeler I was able to avoid most of the pith.


On a side note I have a friend who peels all the white stringy stuff off the outside of oranges and eats it. Yuck.


So after I had my nice pile of zest (and some sad naked lemons which I had to think of a use for) I got to work on the ginger.


It seems the proper ginger peeling method is to actually use a spoon rather then a peeler. Here mom is demonstrating proper spoon peeling technique:


Once I had a couple roots peeled I cut them into approximately one inch sections. I then flipped these sections so the cut side was up (and down) and sliced them thinly this direction. It's important to cut your pieces length wise because otherwise you are running against all those little fibers and it could get very hard to cut. But luckily my ginger was fairly fresh so no fiber issues.

So those steps again are: Peel:


Cut into sections:


Flip and cut sections lengthwise:


Here is my finished pile of cut ginger:


Most of the instructions for both lemon peel and ginger said you need to boil and drain them several times to get them tender before candying them. I boiled my lemon peel once and it was nice and soft and not at all bitter.


I tasted a piece of uncooked ginger and it was also nice and tender so I decided to avoid boiling it at all. (Plus it was nice and juicy and since you boil ginger to make tea wouldn't you be losing a lot of the flavor if you did this?)

Another inconsistency I found in the instructions was that a lot of people complained that most recipes call for way too much sugar syrup. Although the sugar/water ratio needs to stay the same I think that you need just enough of the liquid that the peel and ginger could float around and get coated. I ended up with about 5 cups each of sugar and water.

You then boil it until it reaches 125 degrees on a candy thermometer. What a time I had finding a candy thermometer! But that's another story. I think it probably took mine about an hour to get to this point? Of course I didn't time it because that would have made sense.

I drained my ingredients (saving the syrup that drained off) and tossed all the lemon peel and ginger into a bowl of sugar so it could get nice and sugar crusted. I had to peel a few pieces apart to make sure they all got coated and you need to be careful here because the pieces are very hot.

Here they are drained:


And sugared:


I then laid them out on wax paper to dry for a little bit and they were done! They were both delicious. The lemon peel is milder but the ginger is super intense. It's definitely only for people who really like spicy ginger. The only down side is that once they were coated in sugar the lemon and ginger was fairly indistinguishable.


Those of you with an aversion to waste might be thinking: "Whatever happened to all that syrup?" I had a plan, and it was a good one. My plan was to save the syrup to use in making delicious gingery lemon sodas by combining it with seltzer. This notion was backed up by many people who suggested saving the syrup.

Of course what I hadn't thought of was that if you are candying the ginger and lemon you are also candying the syrup. So when I initially poured it out it was nice and thick:


But within a few minutes it had begun to solidify. There would be no ginger soda for me apparently. Now our only option is to reheat the entire jar to soften it or throw the whole thing out. Not a tragic loss but still disappointing nonetheless.

And the best part about candied ginger? Ginger has medicinal uses so you can just use those as an excuse when you eat some. For example: I had a tummy ache so I needed candy, I swear.

Wednesday, February 18, 2009

Starting to Think About the Garden

So maybe this is a little preemptive but we had a garden planning session this week. It's probably the bout of warm(er) weather but I started to feel anxious that we hadn't ordered any seeds yet. So we ordered...lots of seeds. In all we spent $30 including shipping. This may not sound super frugal but if you figure how many plants we could have bought with this had we waited till spring and bought baby plants it wouldn't have been many.

So here is the run down of what we bought and where:

From Seed Savers Exchange:

1. Ground cherries (a.k.a cape gooseberry): These are totally weirdly awesome fruit/veggie things we discovered at our local farmer's market. They are reminiscent of tomatillos with their papery husk but taste very citrusy, kind of like pineapple. And for those of you with a very good memory I posted about them last summer and even threatened to grow them.

2. Tomatillos: We love salsa verde and tomatillos are just so expensive at the farmer's markets we figured we should just grow our own.

3. Double yield cucumbers: One of the only things we were successful growing last year was cucumbers so we decided to test our luck with this variety that is supposedly "remarkably productive".

4. Dragon carrots: I really don't care for carrots, especially cooked but I can never resist a purple vegetable so we'll give these a go even though our root crops are usually wildly unsuccessful. (Our radishes are generally inedible.)

And from the Bountiful Garden's catalog (website here):

1. Lemon cucumbers: Cucumbers that look like lemons? How could I resist that!? Plus they are supposedly excellent pickles and rust and drought resistant.

2. Pak choi (a.k.a. bok choy): I love bok choy, especially in wonton soup.

3. Southern giant curled mustard greens: We needed some quick greens for the areas of the yard that get good sun early but get too shady in the late summer. This plan might work...in theory. We'll see.

4. Spearmint and peppermint: We are mint fiends. We put it in various Asian foods, I make mojitos with it and we drink unholy amounts of mint tea. We have a little in the yard but we're going all out with a whole bed this year. Mmmmm...mojitos.

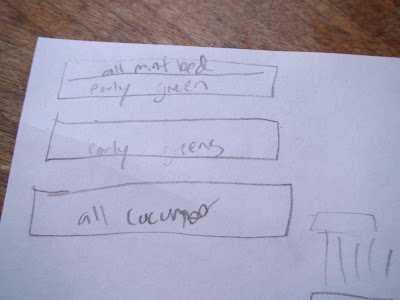
We even walked around the yard and planned out what we'd put in existing beds and where we could fit some new beds. There was a lot of discussion so I used my master draftsman skills to draw up a plan so we wouldn't forget our ideas. It may be a little technical for you but it gives you a general idea:


I know that was a lot of information to take in so here is a close up of one corner in case you'd like to copy my technique:


For those of you not familiar with technical abbreviations it says (from top down): all mint bed/early greens, early greens, all cucumber. Don't be intimidated by my skills, you don't need to be so proficient in planning to design your own garden beds.

So now we need to get to work making lots of little pots out of newspaper to start seeds in. Look for a post on that soon!

Friday, February 13, 2009

Custard's Last Stand

Well perhaps this isn't the last stand of custard, but it does seem to be neglected lately. Maybe I am making too much of a generalization from my experience but it seems like no one likes custardy things anymore (at least no one my age).

My guess is that it's an issue of texture. I can't get my boyfriend within 10 feet of anything too squishy. (Which makes for a tragic situation when it comes to ricotta.) Custards also seem to be very out of style. Which, as I recently discovered, is a real shame.

I had a bunch of egg yolks leftover from baking so the logical conclusion was custard. Although dad was rooting for something sweet, (coconut custard....yuck), I was in the mood for something savory. So I googled "savory custard" and I got this recipe. It seemed pretty straightforward so I tried it.

You start by putting your milk (or cream, but I had milk) in a pot along with a sprig of fresh thyme and garlic. You heat it until just steaming to infuse it with the flavor of the garlic and thyme and then remove them. Although the first time I made this I had fresh thyme I didn't the second time so I put some dried thyme in a mesh tea ball and put that in the milk. It worked fine for infusing but mom almost killed me when she tried to clean the milk out of the mesh. Oops.

Next you mix the eggs with cheese. I used Parmesan and mozzarella since I already had the pre-shredded kind (which is all mom can eat). Then you whisk in the milk very slowly. This is important because if you incorporated too much at once the heat of the milk could start to cook your eggs. And although it hasn't happened to me I'd imagine you'd get something like scrambled eggs, which is fine but not at all the point of a custard.

Then you put your ramekins (or one big dish which is what I did) into a bigger dish in an oven preheated to 300 degrees. Then you pour (very carefully!) boiling water into the outer dish without getting any in your custard. I actually managed to do this successfully, twice!

The recipe says it will take 30 minutes to cook plus more time if you used milk or a bigger dish and since I did both mine took at least 45 minutes. It's done when the mixture is not quite set, it should still jiggle a little in the middle.


The recipe is so easy (at least in terms of how difficult I figured a custard would be) and also fairly fool proof. Although it calls for 3 eggs plus 2 yolks I have done more yolks and less eggs and also once I just used 5 eggs. Both times it worked fine.

The only issue I found is that I used the sprinkly Kraft Parmesan that comes in the green bottle (don't judge me, it's cheaper!) which had a tendency to settle to the bottom so the lowest layer of my custard was a little more grainy from the cheese. But the rest of the custard came out amazingly creamy (even without cream) and the Parmesan layer didn't really bother me.

What I think is the most amazing thing about this is that it was also virtually lactose free. I used 100% lactose free Lactaid (whole) milk and the Parmesan and mozzarella were also (supposedly) lactose free. Although I did this so mom could eat it I didn't detect any loss of quality because of the adjustments.

Now mom makes fun of me because when I come home and I'm hungry and there are no leftovers I'll just whip up a quick batch of cheesy custard for a snack. But of course it's not quick at all, it actually takes about an hour (although much of that is unattended) so I end up having to have a snack while I'm waiting for my other snack to finish. Still worth it though! Long live custard!

Tuesday, February 10, 2009

Another T-Shirt Refashion: Tank Top

After my success with my first t-shirt to tank top refashion I decided to try another one. This time I based it on a favorite halter top I already owned. I started with a kind of yucky XL men's t-shirt (I didn't' want to start with a really nice shirt since this was an experiment). Here is the before:


And after:


How I did it: I used my old shirt to design a pattern piece for the front and the back. Here are the pattern pieces:


As you can see I had a little difficulty getting a good picture.


Actually a lot of difficulty. Finally I got a good one:


Now for my boring attempt at technical instructions: both these pattern pieces are for only half, the right side of each piece is where the fold would go. The one on the left is half the front piece and the one on the right is the same half of the back piece. Tip for knits: last time I tried folding the fabric in half before cutting and it stretched all wonky. This time I cut out one side and then flipped the pattern and used it to cut the other side and this worked much better. The back piece of the shirt is pretty basic with the exception of a little flare at the bottom. The front is the same but taller. It is also not a perfect rectangle: it curves in a little at the top but not too much because I wanted to have enough fabric to scrunch up at the top of the halter. There are seam allowances on the sides of the front and back and a hem allowance on the top of the back piece. There is also a hem allowance on the top of the front but this is larger because it will also form the channel for the straps. Finally: I didn't add a hem allowance to the bottom because I used the bottom of the old t-shirt for the bottom of my new shirt because that hem is always so nice and professional looking. The strap is one long tube which I sewed and then flipping inside out, threaded through the channel at the top and sewed down in the back. Here is the back so you can see the detail:


So I had some more photography issues. And if you think that is the same cat it's not. Don't believe me? Here's proof:


Finally got a good shot:


Here is a closer one. You can see how the strap works and why it's important to make your top hem large so you can get the strap through it:


Another tip: to avoid the little logo on the shirt I cut the back piece out of the front of my old shirt (since the back is shorter) and the front piece out of the back (since the back had nothing on it).

I'm very happy with the result especially considering it was an experimental version. I'm definitely going to play around with the pattern and fabric and try other versions. If this was made a little looser there is no reason it would have to be made from a knit.

Friday, February 6, 2009

Pupusas

In my ideal world I'd be going out to eat a few times a week and writing about it for you here. But there are several obstacles to that the biggest one being I'm poor, super poor (getting laid off will do that to you). Another problem with that is that I can't be bothered to take pictures of what I'm eating while I'm eating it. Finally, I don't know about you guys but I'm not crazy about reading about a restaurant there is never any chance of me eating at. So I have a new strategy: when I go out to eat if there is something I really enjoy I'll try to reproduce it at home and document the results here. That way you can try it at home even if you are a thousand miles away from the restaurant I found it at.

First up: pupusas! Yeah I didn't know what they were either when I saw them on the menu. My friend Michelle (who seems to know all the interesting places to eat in Providence) took me to La Hacienda in Olneyville Square (apparently this is the second restaurant of the same name by the same people) recently to try to the pupusas. A note on Olneyville: we don't really have "scary" parts of Rhode Island but if we did this would be it. But surprisingly (actually not that surprisingly) Olneyville has a lot of fabulous places to eat. This is of course if your definition of fabulous is unusual, delicious, inexpensive food. Maybe not so much if you'd rather not see passed out homeless dudes in the middle of the day on your way into the restaurant.

Back to pupusas: although I'd never had them before they were quite familiar. They are made with basically the same dough as tamales (masa flour) but instead of being wrapped in corn husks and steamed these are stuffed with a filling, squished flat and fried, then served with a sort of coleslaw and salsa. (This place also served everything with an ungodly amount of cilantro, which can be forgiven, but I think I'll leave that out.) Although I believe the restaurant is Mexican these are technically Salvadorian.

So here's how we made ours: we started with the filling. My research showed that there are a ton of different options but we went with pork. We started by sauteing cubes:


We then added green peppers, onions and sofrito (a tomato based sauce):


When it was all cooked we shredded it, and by shredded I mean we tried that for awhile and then ended up chopping it:


To mix up the dough I just combined masa flour and water until it felt like the right consistency. How did I know what that was? I experimented to make sure it wasn't so dry that it would crack when shaped but not so wet that it fell apart.

Although some of the instructions said that traditionally you make a ball of dough, stuff it with meat and then squish it into a patty, I knew I couldn't handle that. Other advice suggested that we make two tortillas and then put the stuffing in between them. This was much easier especially since we own...a tortilla press!


Basically you line it with seran wrap, put a ball of dough in between the two metal pieces and use the handle to squish it into a nice flat tortilla. This worked fine but we hit one final snag. If I made the tortillas and then stuffed them and sealed the edges they came out with a huge lump the in the middle and didn't cook evenly at all. My brilliant revelation: squish them in the tortilla press again after they've been filled! It worked brilliantly and these were very close to what I had at the restaurant:


These are the finished pupusas. You can see that the top one is before I came up with my brilliant technique and it didn't cook quite as evenly.


Here is the final product with the salsa, coleslaw type thingy (cabbage, green pepper, and some seasoning which I've since forgotten) and some extra filling on the side because we made way more then I had patience to stuff into pupusas.


Do me a favor and search pictures of pupusas on google. Don't mine look just like the pictures?!

And yes that is a glass of OJ on the side. I'm classy like that.

These were fabulous but just as big a pain in the ass as tamales...which we make once every decade or so.

So the conclusion? Find a place near you that sells pupusas for like 2 or 3 bucks and just get those. This is one of those foods that if you can get it so well done and so cheap at a restaurant...why would you bother at home?

(Not a very auspicious start to my restaurant recipe theft series is it?)

Monday, February 2, 2009

More Karma

If we were good Americans we'd buy prepackaged ginger tea and pesto in tubs at the grocery store. But we're not, we make our pesto from our own basil and ginger tea from whole ginger roots we grate ourselves. (Coincidentally both of these we freeze in ice cube trays and store in ziplock bags in the freezer.) This doesn't do much to stimulate the economy. In fact we may single handedly be bringing down the American economy (except of course for the ziplock bag industry).

And karma is a bitch. Want to guess what happened or do you need a hint? Fine I'll just tell you: pesto tea. It was bad but perhaps not as disastrous as the alternative: ginger and Parmesan on pasta.

Exhibit A: Tray full of frozen pesto.


Doesn't look much like ginger does it? We're currently accepting donations for the Mom needs new glasses fund.

Sunday, February 1, 2009

Martha Would Be Ashamed of Me

I'm sorry Martha, I Sandra Lee'd it! (If you're not familiar with the Food Network star she uses packets of taco seasoning and pre-made everything as shortcuts therefore if you "Sandra Lee" it you take a cooking shortcut involving some sort of processed food.)

I've been doing more baking from one of Martha Stewart's books (Martha Stewart's Baking Handbook) and I've got to admit, I took a few shortcuts. The first short cut isn't actually that bad. Martha has a recipe for fougasse which actually just points you to her french bread recipe but with a different method of shaping it. Her recipe requires you to start a day ahead of time and since I wanted the bread that day and not the next I just used my regular old bread recipe.

On that note I should mention that I've come up with a pretty effective flour ratio to make bread that isn't too crumbly. I use 4 parts bread flour, 1 part whole wheat and 3 parts all purpose flour. So for one batch that is usually 2 cups bread flour, 1/2 whole wheat and 1.5 all purpose flour. The reason I don't use entirely bread flour is that it is more expensive than regular flour but without it my bread comes out too crumbly.

So I followed Martha's instructions for shaping and here is the loaf:


It's supposed to be leaf like? At least it still tasted good but I probably should have stuck with her recipe.

The next escapade was crackers. Since I have less experience making crackers when I tried her recipe I actually followed all the instructions (well up to a point.)

I'm not sure these were technically crackers since they had a little yeast in them, they were actually more like pita bread but either way they were fabulous.

The only hitch in the instructions was that they tell you to use a pasta machine to roll out the crackers. Since we actually have a pasta machine I dusted it off and attempted to roll out the crackers and was totally unsuccessful. Her alternative suggestion was to just use a rolling pin. For me this ended up being so much easier. So why does she point you to such an obscure piece of equipment if a much more common one works just as well (if not better)?


Despite the fact that some came out inexplicably puffy they were really good. They are flavored with Parmesan and rosemary and although this combination was great I can think of tons of others that would be too.

Now I'm afraid I must fess up to my latest baking adventure for which I really pulled a Sandra Lee. I was so tempted by Martha's chocolate mocha roulade recipe that I needed to try it. What's better than basically a giant Swiss Cake Roll? (Sad that Little Debbie is my culinary reference for these.)

I did fine with the cakey part (although it's almost more like a meringue than a cake). I even whipped the egg yolks and whites by hand (with a little slave labor assistance). But then it came time to make the filling and I realized that even if I went out and bought cream to whip (not more whipping!) Mom still wouldn't be able to eat it (lactose intolerance). Then the powers of evil began to do their work on me and I decided that if I bought Cool Whip that would not only save me the trouble, but it is also lactose free! Plus it probably wouldn't cost me much more then a container of cream to whip. I was sold and I've got to say, I don't really regret it. The roulade came out great and it was already enough work without having to make the filling too.

Now to be fair, these recipes are fairly complicated and I will probably need a little more practice baking before I can execute them flawlessly. But I still feel guilty, sorry Martha! (I didn't even take a picture of it, I'm too embarrassed.)