Tuesday, April 21, 2009

Trauma

Warning: you might want to skip this post if you don't like spiders (don't say I didn't warn you Amanda).

So...I hate spiders. Well, hate isn't really the right word, more like fear. They creep me out, a lot. But I don't like to kill them! I just really really don't like when they are near me and I don't realize it and all of a sudden I'm an inch away from touching one or something horrible like that.

I'm also convinced I have an abnormal number of traumatizing spider encounters (but I'm not sure if they are what cause my fear of spiders or just karmic justice). Here's a good one: when I'd first moved into my old apartment I was going to bed one night and as soon as I turned the light off I felt something hit my arm and I knew, I just knew it was a spider. And guess what? It was a giant black spider. I slept with the light on that night.

Then there was the time I was unrolling a sock and felt something kind of damp in my hand. I threw whatever it was on the ground and leaned down to inspect what looked like a piece of black lint. That was until it unfurled it's 8 terrifying legs and crawled away.

It's mostly the big hunting spiders that bother me. Tiny ones and daddy long legs (which aren't technically spiders I believe) don't really bother me. But there is an exception: specifically the time I was watching television in the dark only to have a black spot obscure my vision. When I put a hand to my face to brush the spot away I realized it was a daddy long legs...crawling across my eye. It was so light I couldn't tell it was there.

So here is the latest incident: I was fiddling with something in my apartment (and by apartment I mean my parent's basement) when I noticed something black a few inches from my hand. Thanks to our handy bug catcher thingy I captured it:


It's playing dead but trust me, it's not.


Here you can see it's horrendous fangs and stripey legs. I hate when they have stripey legs.


This is the best shot I could get of him before we released him outside. I'm sure though that by now he's found his way back to the basement and is lying in wait for me somewhere even more terrifying like my sock drawer.

And if anyone recognizes this spider and just happens to know that he's poisonous...please don't tell me, I'll only be further traumatized.

Tuesday, April 14, 2009

Make Your Own Travel Chopstick Case

Although this technically falls under the crafting category of "things you didn't know you needed," it is still a really cute idea. The premise is that instead of wasting a pair of disposable chopsticks every time you go out to eat you carry along your own pair.

There are other designs floating around for these cases which inspired my design (and those might have better instructions if you are looking for a really precise tutorial). Although you can make these with one piece of fabric I wanted mine to have a contrasting interior so I started with two sets of fabric to make two cases:


Here is where I have to make a confession about where I got the fabric: I bought it at Walmart. I usually try to reuse or recycle fabric as much as possible but I was really picky about the prints I wanted for these and Walmart has this new section of fat quarters for quilting which has some surprisingly modern patterns.

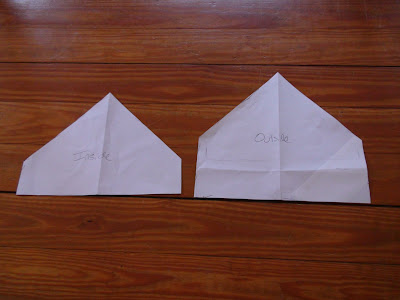
Out of each set I cut one of each of these shapes:


(You'll see later why the outside piece is larger than the inside piece.)

I then pinned them together with the right sides facing each other and sewed along the bottom (leaving a gap large enough to flip it right side out later):


I then pulled the shorter side up so the points of both pieces met (but it is still inside out):


Here it is pinned together:


I sewed all the way along the remaining sides and trimmed off some excess fabric at the corners:


Now the case is ready to flip inside out (so the right sides of the fabric are on the outside now). The last major step was to sew the opening closed and then fold the bottom up to where it begins to angle towards the point and sew that down on either end.


This is what one end looks like:


The reason I made the outside piece bigger than the inside was that if they had been the same the seam would have come out at the top of the little bit you folded up and I thought it would look neater if it was on the inside. So essentially it is being hidden on the inside of the little pouch you make.

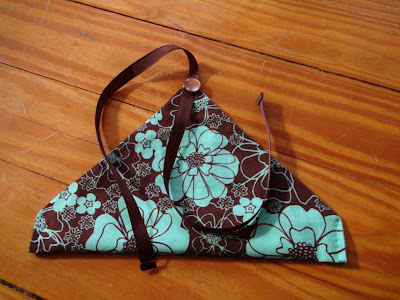
Now all you need is something to keep it rolled up. I sewed a piece of ribbon on the outside of the point and added a button over it to cover my messy hand stitching. I folded the ends of the ribbon over and sewed those down to keep them from unraveling.


Slip in the chopsticks and its ready to be rolled up.


I didn't give you dimensions for how big to make it because it really depends on the chopsticks you get. The ones I found are actually children's chopsticks that I got at a local Asian produce store. I specifically got the children's sets because they are much smaller and therefore more conducive to being lugged around in a purse all the time. Here's a closeup of the chopsticks, they're actually very cute:


Here it is all rolled up and ready to go:


I ended up making three of them. The top one was the test run so I'm keeping that one but the other two are gifts.


Here's the button from the bottom one, it came in a bag of vintage red buttons. It's a face!


Hopefully these came out sturdy enough that they can be thrown in the wash after they are used.

So those are my kind of instructions. If anything isn't clear feel free to ask and I'll attempt to explain!

Thursday, April 9, 2009

Super Frugal Cooking: Reusing Stock Chicken

I guess to begin with I need to make a distinction between several ways of making stock. The first method, which is what you see in cookbooks, involves buying a whole chicken or something like that and then boiling the heck out of it. This inevitably leaves you with delicious stock and a bunch of flavorless chicken.

The second method, which isn't particularly relevant here, is using only inedible chicken parts to make stock. For instance we save all our bones and scraps (like wing tips) in a bag in the freezer and then when we have enough we use those to make stock, maybe with a bag of chicken feet (think I'm kidding?) thrown in. I like this method a lot because it makes you feel like you really aren't wasting anything. But to be fair I'll admit that is a cultural bias, in some places chicken feet aren't considered inedible.

So back to the method of chicken stock that involves a whole carcass. What bugs me about that is all the wasted meat. Some people still use the 4 hour boiled meat for some things but I've tasted it and it just doesn't work for me. So I started doing my own version of this process which involves cooking the chicken for only an hour, taking off the meat and freezing it and returning the bones and scraps to the stock to continue cooking. This way you get chicken that is still edible (although not the tastiest you've ever had) and good stock.


(Bag-o-cooked-shredded-frozen-defrosted Chicken)

While I have described this method previously I don't think I've ever really talked about what we do with the shredded frozen chicken. You might expect these bags to languish in the freezer, forgotten and frostbitten but quite the contrary, they are in high demand. This is because we've found they make really good chicken pot pie (or chicken and biscuits, or chicken and dumplings, or chicken over rice).

Of course when we make any of these variations on the basic creamy chicken stew with veggies over starch recipe we use our homemade chicken stock, which is kind of funny because we are reuniting the chicken with the stock. And although these all come out good there is just something about the frozen chicken that doesn't quite live up to using fresh (by grocery store standards) chicken. But this is a frugal recipe so of course we're going to find a way around that arent' we?

One day inspiration struck me, why not try a little curry powder? (Or perhaps it was the need to use up the gigantic jar of Madras curry powder I had bought.)


(This is the aforementioned giant jar of curry powder.)

I put in a couple teaspoons or so to my basic recipe (flour, fat, stock, milk, misc. veggies, chicken), not so much that it tasted like a full on curry but enough that you got a little of the spiciness. And it was surprisingly good and made up for what the chicken itself lacked. (I'm not giving you a recipe since I don't really have a set one but if you wanted one you could look up any good chicken pot pie recipe and just add a couple teaspoons of curry powder.)


Anyone else use curry powder in something that isn't strictly Indian cuisine? I'm curious because this is a new concept to me and I'm surprised I don't see it as an ingredient more often.

Monday, April 6, 2009

Container Gardening on the Cheap

As I may have mentioned previously the sunniest part of our property is unfortunately the driveway. This has led to an ever expanding container garden that lives there. Like everything else we tried to do this as frugally as possible which means we don't go out and buy lovely glazed ceramic pots for all our plants (although I'll admit I've bought a couple).

The cheapest way to get containers for a garden is obviously to see what you can get your hands on for free. We've had some luck with this, even getting one from a neighbor who knew we used them. But eventually we realized we actually had to buy some. I began noticing that all the large pots, even the plastic ones at the big stores, were still expensive, usually $10-20 each. Now this isn't terrible but for crappy plastic containers it seems like there would be cheaper alternatives. Why would I pay $20 for a plastic pot when I can get a plastic storage tote for $4?

Even better yet I realized we had at least one old tote that was cracked lying around. So I grabbed that plus a couple new ones and transformed them into containers for the garden. The only real modification they needed was drainage holes. I used an electric drill to make 6 holes in the bottom of each container. (These holes will later be covered with whatever we have around, seashells or pot shards, to keep the dirt from falling out or clogging them.)


I put a piece of wood under the spot where I was drilling. Why? Maybe to protect our immaculate lawn? Whatever my logic at the time was it seemed to help. And yes that is me actually drilling the holes, I swear it wasn't staged.


This is my crappy old container after drilling. How did it get so cracked you ask? (I'm aware you probably wouldn't ask that but let's pretend.) It was my recycling bin for awhile. I know it's not standard but my landlord didn't seem to think I recycled so I had to get my own and this had a green lid so I figured it was close enough. And apparently it was because the recycling guys always grabbed our stuff. But perhaps the bin wasn't quite close enough because it got some pretty rough treatment in their hands and that it how it came to be cracked and mangled. And now you know.


And this is the nice new one I defaced. Perhaps purple isn't the best choice but for $4 I can't really complain.

That was basically all that was needed to transform the totes. I even kept the lids to shelter the containers until the seedlings emerge to protect them from cats. Although if you do this you have to remember to take off the lids so the containers can get water when it rains. But then again you might want to leave the lid on if you are worried about a really torrential spring rain washing away your seeds. It is a delicate balance of lid use, but I don't have a job so what else do I have to do?

And if you are aesthetically offended by the look of these (which I wouldn't blame you) you could always surround them with your nicer containers.

I wish I had some nice pictures of these filled with plants but it's a little early for that. Since this is the first year we've tried to use these types of containers I guess this is still all theoretical but I don't see what could go wrong unless the plastic leaches chemicals into our vegetables and they all mutate. I hope that won't happen, but I promise to let you know if it does!

Thursday, April 2, 2009

The Joys of Poutine

I don't actually know why I didn't think of this myself: french fries, gravy and cheese. What else could you really want out of life? I'm not sure why this brilliant Canadian creation doesn't get more attention.

Although I've never had authentic poutine (ie: made in Canada) I've been striving to replicate it myself. The only problem is that finding cheese curds around here isn't exactly easy. So up until now I've just been eating fries with gravy, and not even the proper gravy, I use canned turkey gravy (don't scoff unless you've tried it).

But lo and behold on my first trip to Trader Joe's this weekend I found Wisconsin cheddar cheese curds! I'm not positive what the exact difference is between cheese curds and regular cheese (I'm sure I could figure it out if I checked Wikipedia but I already looked up poutine and that's enough research for today) but from what I understand cheese curds should be squeaky.


So with my squeaky cheese curds in hand I returned home and threw some frozen fries in the oven. I suppose I could have made real fries or used homemade gravy but that doesn't really seem quite in the spirit of poutine.

So once my fries were sufficiently heated through I topped them with the curds and put them back in the oven for a second to get a little melty. Then I topped it with deliciously hot microwaved Campbell's turkey gravy (which I have a soft spot for even though I'm not sure it counts as food).


And it was amazing, really amazing. I may in fact start a poutine fan club in Rhode Island. (And yes, I know those are technically potato wedges and not fries but that's all I had! And I also know cheese curds aren't always orange but a little annatto never hurt anyone.)

P.S. Funny story: 5 years ago I was in Quebec and didn't even order poutine! Sadly I didn't know it existed at the time and therefore missed my opportunity to try probably one of the most brilliant culinary creations ever.

P.P.S. I don't actually recommend trying this. Unless of course you want to get really fat, really quickly. In which case be my guest.

Wednesday, April 1, 2009

Garden Bed or Litter Box?

The tough thing about gardening is that there are so many unknowns. Although cooking can have variables generally if you have the correct ingredients and follow the correct procedure things come out fairly reliably. But with gardening things can vary wildly from one yard to the next or one year to another.

Take for instance one of our unique problems: where we see plant beds our cats see big giant litter boxes. Gross, I know, and not something any gardening book can really prepare you for. The first issue is that their incessant digging tends to kill any baby plants that come up. The second is that for food crops, especially greens, I don't think raw cat manure is the most sanitary thing.

This has already become an issue with our garlic crop this year. We should have seen it coming. We put our garlic in the same place we had our wheat last year (which you may recall Toaster also destroyed). So we needed to protect the garlic, and quickly.

Our solution: a frame of sticks covered with chicken wire. So far it has worked quite well and is also quite elegant if you ask me.


And yes I know it's all crooked, that was on purpose. We were going for a rustic look.