Wednesday, August 27, 2008

Frugal Lunch

A frugal lunch is easy. But a frugal appetizing lunch, that takes a little more effort. Unfortunately, when you’ve spent all day doing something crazy like canning you may be hungry but you probably don’t feel like whipping up something totally from scratch.

In a situation like this I always find myself turning to that salty yet trustworthy friend: ramen. For me this was an especially frugal choice today since I somehow came into possession of a whole case of the chicken variety at no cost to me. My solution to jazz it up: besides the noodles I threw in a few raw shrimp and some frozen peas. Conveniently the noodles, shrimp and peas all cook in about the same amount of time. When it is ready and I have added the terrifying packet of flavoring I also add some sambal oeleck (chili paste) for added kick.

And here’s the real secret to making ramen more gourmet: eat it with chopsticks. I swear this makes it so much better. Or maybe this is psychological trick that only works on me.

Either way for a lunch that only took three minutes I can’t complain.


(P.S. You can save shrimp shells or tails for flavoring stock. Just throw them in a baggy in the freezer until you need them.)

Monday, August 25, 2008

The Curious Incident of the Peach in the Afternoon-Time

“How am I going to write about the peach disaster?” I whined to my mother.

(To answer your question: yes while I am doing something I am totally conscious that I will soon be blogging about it. I have even been known to say “Crap I need to do something so I can blog about it.”)

My mother replied: “It wasn’t technically a disaster.”

I realized that although our plans for canning peaches had been totally derailed, since they were salvageable it wasn’t technically a disaster but more of a crisis which had been averted.


Our original plan was to do quarts of halved peaches in syrup. We bought about 12 or 13 pounds of peaches and began the process of boiling them to remove the skins. We discovered that some were still so under ripe that the skins were almost impossible to remove. Others were ripe enough to remove the skins but it was impossible to get the peach halves off cleanly without mushing them.

So what we ended up with was a bowl of peach pieces in lemon water to prevent them from browning. Although we probably could have proceeded with our plans we decided that they would have been too ugly.

After an emergency perusal of our Ball Complete Book of Home Preserving we decided instead to make a batch of peach butter.

Although this recipe for peach butter called for lemon juice and zest another recipe we had didn’t so we just stuck with peach puree and sugar (the ration was 2 parts puree to 1 of sugar).

(In hind sight I can see why lemon would be good, to cut some of the super sweetness of peaches.)

We mixed 8 cups of pureed peach (which was convenient since our peaches were already fairly mashed up) with 4 cups sugar and brought them to a boil and then simmered for almost an hour stirring frequently. We then put them in 7 sanitized jelly jars and processed them in boiling water for 10 minutes.


With the other half of our peaches we plan to try making what the book refers to as “spreadable fruit” which appears to be basically peach jam. So check back soon to see how that goes.

And if anyone has ever been able to successfully halve peeled peaches, what kind of peaches did you use? Did you boil them first to remove the skins? I’m not sure I believe it's possible.

Sunday, August 24, 2008

A New Low Point

How could I have forgotten to tell you about this incident at the farmer’s market this weekend:

We approach the stand of the farm from which we usually buy chicken feet. Since we had inquired about them the week before as soon as the farmer saw us he asked if we wanted our chicken feet. He sent someone to grab them and while we were waiting another person working at the stand asked if we were being helped to which we responded that we were just waiting for the feet.

And this is what she said: “Ah I should have recognized you, the chicken feet family.”

My response was “Oh dear, is that how we’re known?”

She reassured me that it was a good thing and we discussed the wonders of homemade chicken stock.

And it is a good thing, I’m proud of making my own stock with chicken feet. I find it dishonest to enjoy eating meat products but to be unable to deal with those parts that actually remind you of an animal.

But still, I’m not sure I want this nickname to spread.

And to remind you why more people don’t make their own stock here’s a picture of a bag of frozen chicken feet!

Saturday, August 23, 2008

Attack of the Expensive Tomatoes or How I Learned to Stop Worrying and Buy Cheap Tomatoes

Today marked one of the best attended farmer’s markets all year: the tomato tasting. Besides the usual booths a large tent was set up where you could sample about 30 varieties of tomatoes from local farmers. They even provided a handy sheet to make notes on.

Besides our old favorites: Persimmon, Cosmonaut Volkov and Paul Robeson we discovered two new cherry tomatoes we loved: Juliet and Sungold.

The tomato tasting just happened to coincide with our plans to can tomatoes. Although I would have loved to have bought our tomatoes from a local organic farmer, at $4 a pound for heirlooms they would have been very expensive canned tomatoes.

Instead we opted for the supposedly local plum tomatoes at the grocery stores. At $1 per lb they made for theoretically affordable canned tomatoes.


So with our 21 pound case (I know it says 25, it lies) at home this morning we began the numerous steps. First we had to wash them and cut an “X” in the end to aid with removing the skins. Then we dunked them all into boiling water for about a minute in small batches which were then plunged into ice water.


(This is what 21 pounds of tomatoes which are ready to have their skins removed looks like. Please ignore the mess of assorted vinegars and oils in the background which never seem to make it back to the cabinets they supposedly belong in.

Once all the tomatoes had endured this treatment we slipped all the skins off. Then, working in small batches we cored and quartered them and put them in a pan on medium high. According to the Ball Complete Book of Home Preserving (from which almost all of our canning recipes come) you only need to squish the first few cups or so and the rest will break down on their own as they simmer and get stirred.

And it is here I am sad to say we made our first real canning error of the season. I guess we were too inattentive in our stirring because some of the tomatoes burned and stuck to the bottom of the pot. We realized our mistake when charred black bits began floating to the top. We tasted them and decided that since they didn’t particularly taste bad (like caramelized tomato) it wasn’t a total disaster so we picked out the pieces we could and forged ahead.

Once the tomatoes were satisfactorily disintegrated we took our sanitized jars out of their hot water bath. The first thing to go into them was bottled lemon juice (2 tablespoons for quarts, 1 for pints and bottled because it has a reliable level of acidity). According to our book this is necessary because tomatoes are just on the cusp of the level of acidity needed for safe canning.

Once the jars had been given their dose of lemon juice we added the tomatoes, wiped the rims and sealed the jars. They then enjoyed a 45 minute boiling water bath (that timing is for quarts, 35 for pints).

Our total yield ended up being 7 quarts, 7 pints and an extra quart which we didn’t bother canning and stuck in the fridge for tomorrow’s dinner.

What surprised us about this yield was that it exceeded what the book told us we should get. They claim that you need 2 ¾ lbs tomatoes per quart. So with 21 lbs we should have ended up with about 7 1/2 quarts. We ended up with 11 ½. I honestly cannot figure out why.

We’re exhausted. And I’m sure someone out there is thinking why go through all this when they have perfectly decent canned tomatoes at the grocery store? I don’t have a sane answer for you. And would you believe we’re planning to do more tomatoes this year?

(Check back in a day or so for an update on the success or failure of peach canning.)

P.S. Even our cats are frugal. Zoe adopted the box from the tomatoes as a new bed.

Thursday, August 21, 2008

Buttermilk (sort of)

Did you know you can make your own buttermilk, kind of? It probably isn’t of much use unless someone in your house is lactose intolerant, in which case it is very useful because you can use Lactaid milk to make it.

The recipe we had (from The Home Creamery by Kathy Farrel-Kingsley) said you could add either 2 tablespoons cream of tartar or 1 tablespoon vinegar or lemon juice to a cup of whole milk and let sit for 15 minutes at room temperature. In theory it should curdle the milk. (Sounds yummy right?)

Ours didn’t curdle but it did sour so we figured it would work for our recipe.

We make buttermilk biscuits from the same book. They had flour and cornmeal (but more of the former), cheddar cheese, parmesan and chopped scallions among other things. They came out delicious and huge and we ate them still warm with more margarine for good measure.


P.S. I mentioned in an earlier post that we brined pickles. The instructions for this command you to skim the scum off of the top of the crock of pickles everyday. At first we didn’t detect much scum but we still skimmed. Then all of a sudden we had scum. And when I say scum I mean there was an opaque lacy layer of white yuck on top of the water. Yet we still bravely continue to skim it off. I’m not sure how I’m going to feel about eating these pickles. The good news is that we tasted some of our bread and butter pickles and they are good. This weekend looks like it will be another marathon canning session.

Wednesday, August 20, 2008

The Great Watermelon Rind Pickle Experiment: Part 1

It’s an argument that has repeated itself many times: my mom and I are in the pickle aisle at the grocery store and I spot a jar of pickled watermelon rinds. I get excited and say I want them to which my mom replies “you won’t like them.” I don’t know if this works on young children but it usually discourages me. But after a recent discussion with a neighbor who declared her love for pickled watermelon rinds I was emboldened.

The most logical way to try something new like watermelon rind pickles would be to buy a jar for a few dollars at the grocery store and sample them. But I like to make things difficult so I decided to buy a whole watermelon and make them myself.

Since we were going to be using the rind itself I decided to splurge and get an organic watermelon from our local farmer’s market. Although this made the experiment more expensive I rationalized it by telling myself that although the watermelon was five dollars (and weighted a little over five pounds) the rind would have been thrown away anyway and was therefore technically free.


Our first surprise came when we cut the watermelon open. It was yellow! Although I had heard of yellow watermelon I was unaware that I had bought one (if that is the fault of me or the person who wrote the signs we may never know). Sadly the conclusion among my family was that the yellow watermelon wasn’t actually as watermelony as red watermelons.


But I proceeded with the pickling. First I sliced the watermelon into 1 inch slices (ok I’ll admit it, my dad actually did it, I hate cutting melons). Then I cut the flesh off of each rind (I actually did that part). Once I’d put all the flesh aside to be nibbled (that sounds grosser then it actually was) I peeled the green part of the rind off with a potato peeler and cut the rinds into approximately 1 by 2 inch pieces. These pieces got layered with salt, weighted down, covered with water and then they sat overnight.


The next day we thoroughly washed the rind pieces and when we tasted them we discovered they were already edibly soft and surprisingly watermelon flavored. Although the recipes I consulted wanted me to boil the watermelon for either 10 or 15 minutes until fork tender I decided to forgo this step since the watermelon already seemed tender enough to me.

One recipe wanted me to boil the rind in the pickling liquid for a long time (I think it said at least an hour) while another recipe wanted me to bring the liquid to a boil then pour it over the rind and let it sit at room temperature for 2 hours. I thought that boiling it for an hour seemed like it would have made it too mushy so I opted for the latter choice and heated the pickling liquid and poured it over the rind and let it sit.

Although most recipes call for the rinds to be flavored with cinnamon I instead decided to use fresh ginger, a suggestion I had found in a recent issue of Cooking Light magazine. I also used cider vinegar instead of white vinegar so my rinds may be more brownish then most.


The worst part is that I have to wait to see how they came out, I’m very excited. Although mom had initially been reluctant when I suggested doing a second batch she relented when we realized we had already promised to give away 2 jars, and had only made 2 jars, which meant we wouldn’t have been able to try them. So we’ll just have to make more!

Saturday, August 16, 2008

Ground Cherries

One of my favorite parts of farmer’s markets is the new foods you discover, the things that big industrial farms don’t bother with but a local farmer might try just for the heck of it. A couple years ago one of the farmers at our usual market was giving away samples of ground cherries. Although they look kind of like a tomatillo because of the paper husk they grow in the fruit inside is closer to a cherry tomato. What was so surprising was the flavor: they are actually quite sweet. An apt description I read somewhere is that they are a cross between a tomato and a pineapple.

So now every year when we see them we indulge in one pint just because they are so fun. (And you don’t want to know how much we pay…it’s not very frugal.)

I would love to make jam out of them and I have read that they are great dipped in chocolate but I wouldn’t bother with either of those projects unless I had a larger, cheaper supply. The only way to achieve that might be to grow them myself so you’ll just have to wait until next year to see if I can even find seeds.

Friday, August 15, 2008

Sun Tea

I don’t like to drink water. You got a problem with that? Even though we have hard water (supposedly the better for drinking but worse for suddsing [I think I made up that word so I guess I get to make up the spelling too?) I’d prefer juice or tea, even seltzer, at least that has bubbles! But drinking anything bought from the grocery store can get very expensive and isn’t particularly environmental (lots of water being shipping all over the country).

Our solution to this (at least in the summer) is to always keep a batch of sun tea on hand. Although we still buy juice and milk the sun tea ensures that these last longer.

Dad’s recipe:

For every one cup of water:
1 teabag (we use Red Rose, mostly for the little figurine that comes in each box, don’t even pretend you don’t do the same thing)

1 teaspoon dried spearmint (or a couple fresh spearmint leaves)

Add the teabags and spearmint to a clear glass jar and then add the water. Set out in the sun for a few hours. Then strain and add sugar to taste while the tea is still warm and refrigerate. And trust me: the spearmint is important. I suppose you could use other kinds of mint and fresh or dried are both good, although they yield different products. But it really isn’t nearly as good without the mint.

You may end up doing this every day. We do. And we’ve discovered it doesn’t actually have to be that sunny for it to work. As long as its fairly hot I think its fine.

Now my question is: does anyone have a good recipe for sun tea that uses green tea?

Tuesday, August 12, 2008

Chicken Feets

Before I outline the process involved in making our own chicken stock I think it is necessary to explain why we would go to such great lengths when there is chicken stock available at the grocery store:

1. it's more frugal
2. it's more environmental (no boxes of what is essentially water being shipped around the country)
3. no MSG!
4. no god-knows-what-other chemicals
5. you can control the amount of salt
6. it can be used for Asian soup (which boxed celery flavored stocks can’t)
7. it’s a lot better, and I mean a lot

So here’s how we did our latest batch: first we bought a several pound bag of chicken feet from an organic farm at our local farmer’s market. (Note: you must be strong willed and strong stomached to stir a boiling vat of chicken feet.) (And if you aren’t lucky enough to have a local farmer who sells chicken feet try looking at ethnic markets, I recently saw them for sale at an Asian market.) Next we bought a huge package of chicken legs (bone in and skin on of course) at the grocery store which was on sale for $.79 a pound!

I started the stock by covering the chicken leg parts with just enough water so they were submerged. I brought it to a boil and then simmered it covered (or uncovered, probably doesn’t matter as you’re going to want to reduce it later) for about an hour. I then removed the legs and let them cool.

The reason I cooked these for only an hour was that I wanted the meat to still be usable and if it is cooked for too long it becomes pretty much flavorless. So while the meat still retained some flavor I boned and skinned it and ripped all the nice pieces off (with my bare hands…not a pretty sight to see) and threw them in a bowl. I then threw the bones and skin and all the other little bits back in the pot of water with the frozen chicken feet and simmered that uncovered for at least another hour.

The useable chicken bits I bagged and froze for future use in soup or chicken salad, making sure it was well labeled as it would otherwise be quite a mystery when dug out of the back of the freezer six months down the line.

When the stock had cooled enough I strained out all the bones and was left with astoundingly golden chicken broth which I put in a smaller pot in the fridge overnight. The next day when I removed it had a nice half inch of fat on the top which I skimmed off with a spoon. The fat went into a small pan so I could cook out the moisture over low heat. The fat then went in the fridge for some future use…although I’m not sure what yet.

The stock also got warmed again but just enough that it could be poured into several containers to be labeled and frozen.

Although I find plain chicken stock to be the most useful, if you know you are going to use if for Asian soup (Japanese, Chinese, etc.) you can flavor it with some garlic and ginger while it is still cooking.

And a note on salting: you should probably wait until the end of the cooking process to salt, because if you salt it early on, as it reduces it can become way too salty. In which case you might as well go out and buy commercial stock with its 900 mg. of salt per serving.

But beware the homemade chicken stock: if you make it you will become so spoiled that you will find it impossible to go back to the store bought kind and you will be forever burdened with the task of locating and then cooking down scary chicken parts for your stock.

And again, I have no delicious picture of a boiling vat of chicken feet for you, but I just can't stand to have a pictureless post so how about a cool squash blossom?

Sunday, August 10, 2008

Frugal Shopping: Asian Markets

Let me set the scene for you: I was reading the Vegenomicon (huge Vegan cookbook, I’m not vegan but was still intrigued) and came across an entry on agar-agar, a seaweed used in Asian cooking which acts as a gelatin substitute. I was interested in trying it so when I went to a local health food store I looked for it and found it…except they wanted eight bucks for a tiny package that would have only thickened about 4 cups of liquid! That makes it very expensive per pound. (Needless to say I didn’t buy any.)

Flash forward a few weeks and we are at the Chinese American Mini Market (which is actually a rather large Asian grocery in Providence) and they have agar-agar much, much cheaper. (Needless to say I buy two bags.)

The lesson here is that if you are looking for hard to find ingredients for Asian cooking they will probably be very overpriced, that is unless you go to an Asian market. That is why, despite the ridiculous cost of gas these days; we still shlep to Providence every couple months to shop at the Asian markets there.

Although we had recently stocked up at the Asian American Mini Market our pantry was still missing a few ingredients (mostly Japanese which the Chinese American Market is not strong on) so we ventured to Asiana in East Providence (good for Japanese and Korean ingredients) and Asian Star Market in Providence (for southeast Asian ingredients).

(I say ventured as if we took a leisurely drive. It was actually quite frustrating since every exit we had planned to take was closed and we had to re-plan our route mid trip several times. That’s Rhode Island roads for you. Thanks Cardi Corporation!)


We bought: dried anchovies, what was hopefully kelp but definitely some sort of seaweed (the packaging at Asian markets can often be rather short on English), dried bonito shavings (the first three things are for soup stock), roasted barley tea (an experiment), sesame seeds, adorable little green Thai eggplants (couldn’t resist), wet seedless tamarind paste (tastes like very tart raisin paste, so far the only thing I use it for is tamarind martinis), chocolate and marbled green tea Pocky (an awesome candy, they are like dipped pretzels, a treat for my boyfriend), three bunches of lemon grass (most of which we will freeze), dark soy sauce, fish sauce, whole black pepper, Japanese noodles, Korean noodles and green tea buckwheat noodles.

Although Japanese noodles are not really frugal in the sense that they are actually quite expensive as far as pasta goes, they are cheaper if you buy them at an Asian market (and having them is not optional, we make Japanese soup with soba noodles on a fairly regular basis).

We usually use one of two broth recipes:

Dashi: seaweed (kelp) and bonito (dried fish) flakes which we can mixed with either miso paste or chicken stock (preferably homemade, western style stock with seasonings like parsley don’t really work).
Strong stock: seaweed (kelp), dried anchovies (heads removed), dried mushrooms, soy sauce, sake and sugar.

Although you can put lots of things in the soup like chicken, veggies, egg, or tofu we have learned from experience that if you are going to use noodles it is easier to cook them separately. When they are done drain them and toss with some sesame oil so that they will not get overcooked languishing in the soup while you are waiting for everyone to eat.

And a great way to use up any excess cucumbers from the garden is to make a simple cucumber salad to accompany your soup. Place sliced cucumbers with a generous sprinkling of salt in a dish and let sit for five mintes. Then rinse them and dress with rice wine vinegar and sugar and let sit for another hour or so.

I don’t want to hear any complaints that it’s too hot for soup, try it, its damn good!

Coffee Grounds

I work at a coffee shop and coffee grounds are one of the things recommended for compost heaps…so it’s a wonder it took me almost four years to realize I could save the grounds at work and bring them home for our compost heap.

Well better late then never so I recently started saving the grounds all day at work (I can easily fill a good sized bucket in one day). I do it about once a week and dump the grounds, filters and all, on our compost heap. Since I just started doing it this year it remains to be seen how it will affect the quality of our compost.

You may be wondering, how is this relevant to me, I don’t work at a coffee shop?!?! (Well at least I hope you don’t.) That’s not a problem; you can just ask a local coffee shop for grounds. But having been on the receiving end of one of these requests let me warn first about what NOT to do.

Here’s the scenario: I work at a chain coffee shop and my manager very nicely agreed to save coffee grounds for this woman’s organic compost. Now you have to understand that a manager can only ask his employees to do so many things before they mutiny so when he asked us to collect coffee grounds for this woman, it cost him one other thing that he may have wanted to ask us to do which would have actually benefited him. Basically what I’m saying is we were doing her a BIG favor. How does she thank us? By giving us attitude about how the plastic bags we were giving her the grounds in weren’t environmentally friendly. Now of course she’s right but she hadn’t given us a container either so what did she expect, we were going to weave a freakin' basket to put them in for her? Needless to say we didn’t do this for very long.

My point is: go ahead and ask a local coffee shop to save some grounds for you but be very, very grateful. In fact, monetary thanks would probably be much appreciated, a few dollars tip every week for instance. But if you really don’t have the money for that, consider giving them some of your over abundance of produce (I know you have extra zucchini!) Alternately some nice home made cookies would also be very much appreciated but no matter what, keep in mind that these people are doing YOU a favor, and if you act accordingly they will probably be more than willing to keep doing it for you.

Or you could just quit your job and work at a coffee shop and get all the free coffee grounds you like, as well as the added perks of most certainly developing a severe caffeine addiction from all the free coffee, and having every item of clothing you own stink like wet coffee! Boy do I love my job.

(I don't have any delicous looking photos of rotting coffee grounds for you so how about a picture of our lovely phlox?)

Thursday, August 7, 2008

Zucchini Wars

Considering the abundance of zucchini you may now be experiencing if you grow it yourself, it should come as no surprise that tomorrow, August 8th, is Sneak Some Zucchini Onto Your Neighbor’s Porch Night (according to allrecipes.com this holiday was established by Tom Roy).

(It may however come as a surprise that National Zucchini Bread Day is April 23rd [or 25th depending on your source] since zucchini is not in season then.)

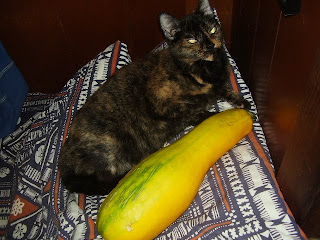
For us the zucchini donations began early, although not in secret. Our neighbor brought over a whopper of a zucchini from her grandmother’s garden.

I took this picture with our cat (yes another one) to give you a sense of scale.

(Think she looks angry in this picture? You would too if you’d just been subjected to an intensive photo shoot with a giant zucchini as your costar.)

Although tradition would dictate that a zucchini this large should be stuffed it was so hot we couldn’t bear to use the oven so we sliced it into thick discs along with an eggplant and threw it on the grill with some red cipollini onions, green peppers and baby portabella mushrooms. When it was all nice and yummy and grilled we just threw the ingredients into pita pockets with some homemade garlic yogurt sauce.

When I brought up the subject of zucchinis at work one coworker remarked that she remembered back in the day (the 70’s I presume?) when no one had car alarms people used to be so desperate to get rid of spare zucchini that they would open strangers cars and leave the zucchini inside.

If you find yourself that desperate to get rid of zucchinis (or you find some in your unlocked car) here are a couple of the ways I have found to use up zucchini that don’t involve turning on the oven in August to make zucchini bread.

Zucchini in Chili

Gasp! I know, those of you who are chili purists are probably revolted by the idea of zucchini in chili but trust me, my chili is already so corrupted a little zucchini won’t hurt it. I usually slice up the zucchini and throw it in early enough that it basically disappears into the chili although you can put it in later if you want it to retain some structure.

Zucchini Frittata

Now that Dad has retired we have a left over crisis at home. Randy takes lunch with him to work and Mom and Dad are home during the day so by the time I get home at 3ish looking for a late lunch most of the good leftovers are long gone. To deal with this problem on Monday Dad cooked me a zucchini frittata which is great because it is actually best leftover, served at room temperature, and can even be made into a sandwich.

Ingredients:
oive oil
1 lb. zucchini
8 eggs
3 cloves garlic, chopped
12 fresh basil leaves, chopped
1/4 cup grated parmesan
fresh grated pepper

Steps:
Grate zucchini into a colander, sprinkle with salt, let drain for 30 minutes or more, squeeze moisture from zucchini.
Heat 2 tablespoons olive oil and saute zucchini and garlic on medium high until soft (2-5 minutes). Remove from heat, let cool.
Beat eggs, add basil, parmesan, pepper, zucchini and garlic and mix well.
Preheat oven proof skillet (we use cast iron) with 2 tablespoons olive oil over low heat. Add egg mixture, cover pan and turn heat to very low and cook until eggs are curdled almost to the top (about 10 minutes).
Pre-heat broiler, put eggs under broiler until top is browned and puffed (about 5 minutes).
Remove from heat and leat cool, loosen with spatual and invert onto plate. Enjoy!

(Adapted from Cucina Fresca by Viana La Place and Evan Kleiman.)

We may also end up pickling zucchinis this year, a great way to save them for yourself if they are piling up quicker then you can eat them. Look for that in future posts!

And now, to commemorate this great American holiday, I will shamelessly include some very cute pictures of one of my cats.

This one displays Toaster's astounding whiskers which are actually closer to lobster's feelers then whiskers:

This one is embarassing for several reasons:

1. You can see how unorganized our living room is. Sorry Mom.

2. Our cat is an exhibisionist.


P.S. This must be the ultimate Zucchini day since its not just August 8th but actually 8/8/08!

Tuesday, August 5, 2008

Pickling and Then Pickling Some More

I know I’ve been growing lax in my updating but here is why: this weekend we bought and dealt with 22 pounds of cucumbers. (Thought we’d learned our lesson from the currants? You should have known better.)

Since our cucumbers aren’t being productive enough that we have enough at any one time to can we went to Schartner’s and bought a box each of small and large pickling cucumbers.

(We also bought their French fries, which they cut and fry right in front of you, delicious with vinegar, and two raspberry bushes which Dad was forced to plant this week).

The cucumbers deteriorate rapidly so canning commenced immediately. We started with a 5 pint batch of bread and butter cucumbers but when we saw how small a dent that made in one of the boxes we decided to double that amount and ended up making 10 jars worth.

The next day we made 6 pints worth of dill slices but still, so many cucumbers! Even after eating cucumber and butter sandwiches for lunch we still had too many. (Well actually they were cucumber and margarine sandwiches since someone is lactose intolerant but they are delicious anyway because I gussy up the marg with generous amounts of chopped herbs like parsley, thyme, chives and rosemary.)

(Bread and butter on the left, dill slices on the right)

We had run out of steam so we resorted to brining the rest of the cucumbers in a large crock. You’ll find out how that worked out in several weeks.

That’s all for now, I’m exhausted just thinking about cucumbers, I may be too traumatized to even eat the pickles.